


Creating your own website is actually pretty easy today, though it is still intimidating, especially to beginners since they have no idea where to start. Simply follow this quick guide and you will be able to have your very own website up and running in less than an hour.
Choose the Correct Content Management System (or ‘Website Builder’)
Before Website Building software, if you wanted your own website you would have to build it via HTML and/or Javascript. Today, thanks to people much smarter than us, there are much faster and easier ways to make your own website. See pic below (via opensourcecms.com).
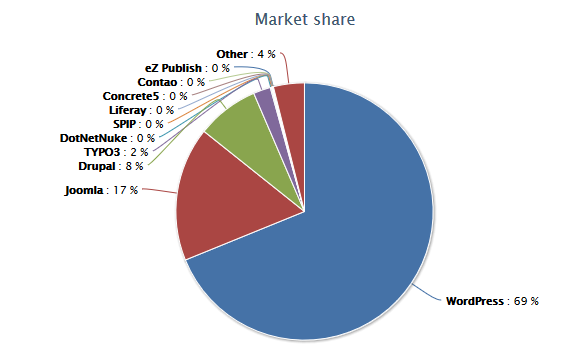 As you can see, WordPress (in my opinion the easiest to use CMS) is destroying the competition, representing nearly 70% of the market share and there are plenty of reasons why.
1. WordPress is extremely easy to use and free.
2. Coding languages (Javascript) and HTML are not needed to create your own website.
3. Tens of thousands of free plugins are available to spruce up your website.
4. WordPress also comes with thousands of free theme designs for your site.
5. Setting up WordPress is extremely easy, even for new users (did I mention that it is also free).
If you are a beginner then I highly recommend using WordPress to build your first website. Even if you aren’t a beginner and perhaps have already created a website with coding languages or with another CMS, WordPress is still a solid choice and continues to get more and more advanced after every update. The graph above doesn’t lie, does it?
Are you ready? Ok so now lets move onto the steps in creating your own website with WordPress. A couple things you will need for this guide:
1. About 30 minutes to an hour.
2. Credit card or Paypal (websites aren’t free unfortunately).
3. Your website name, or URL (yourwebsite.com).
Three parts to creating a website

Your Domain Name (yourdomainname.com)
 Web Hosting
Step 1: Choose a Domain Name
The first thing you need to do when making your own website is choosing your domain name. Your choice domain name is probably the most important decision you are going to make relating to your website, so give it some thought. In most cases, you have to register your domain name every year for a small fee (between $10 – $15), however, some web hosting services (next section) give you a domain name for free for a year, or for life. More on that later, first make sure you have researched a bit and your domain name fits your blog/website’s “theme” or niche. For example, my website domain name is tomakeawebsite.net and the site name fits the content of the website (helping people build their own website). Do some research and put some thought into your site name.
Building a Personal Blog: Tips for Creating and Sharing Your Content
Step 2: Find a Web Hosting Service
This step is also extremely important. Choosing the right web host will save you plenty of headaches down the road. In short, a web host is the service that houses your website and provides you with critical things like bandwidth, email accounts for your website, an FTP account, and any scripts or software that you need to install (such as WordPress).
The majority of hosting companies like to try and overwhelm you with all of their features and freebies, but for the most part they all offer the same. The one exception is that some hosting services offer a free domain name.
My personal recommendation for web hosting is GreenGeeks.com. They are cheap, respond to any questions or concerns quickly and best of all, they give you a free domain name for life when you sign up, so you don’t have to worry about renewing your domain name every year.
Since I house all of my websites on GreenGeeks, I will be using their Control Panel to show you how to do everything, but don’t worry, the Control Panels (cPanel) that web hosting services use are all relatively similar.
Get Started With Green Geeks
Step 3: Install WordPress
Installing WordPress only takes a few minutes, and once you’re done the hard parts are over. GreenGeeks and pretty much every reliable Web Hosting Company have integrated ‘one click install scripts’, simply navigate to this section on your cPanel account and install it onto your website. Here is how you do that:
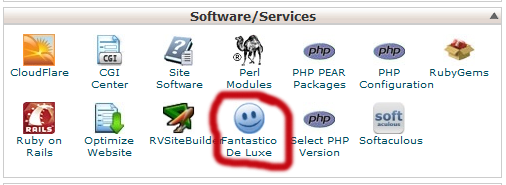
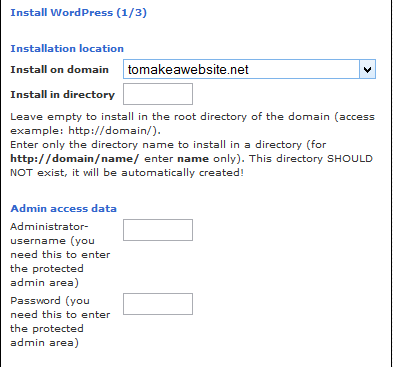
Navigate to your “Software / Services” section in your cPanel. Click on “Fantastico De Luxe” (it may be named something else depending on what web host you chose).
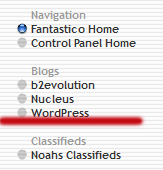
 After you clicked into Fantastico, click on WordPress:
Next simply click on ‘new installation’ and install WordPress:
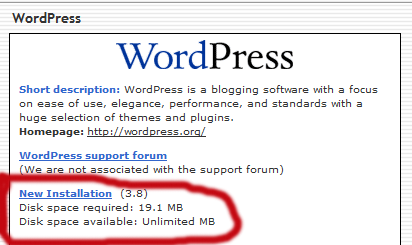
After that, simply choose your website from the drop down menu and fill out all of the fields. Voila, you have just installed WordPress.
Step 4: Pick your WordPress Theme
Picking your WordPress theme can be a daunting task since there are literally thousands of (free) WordPress themes to choose from. Head over to the theme section of WordPress and browse around for a while before continuing. One thing that should probably stand out is how bland and non-advanced free WordPress themes are. That is not to say that you can’t find a good, free WordPress theme, but if you are wishing to create an advanced website, or one that makes money, then you should consider ‘going premium’ since premium WordPress themes have far more functionality than free themes.
If you prefer to go free, then head over to WordPress and check out their free themes available. You should be wary though and know that WordPress is constantly performing updates, for example WordPress 3.8 was released only two months after 3.7. If your free theme is not updated to be compatible with the latest version of WordPress then you may run into some serious problems. This is why I hate free WordPress themes, they are unreliable, unlike Premium WordPress themes from known developers and websites. My personal favorite is MyThemeShop, who have themes that are reliable, feature rich and cheap, as well as having an A+ support system. In fact, the theme I am using for this website is from MyThemeShop.
That’s not to say that free themes should be discounted entirely. If you are wanting to build just a casual website or blog that isn’t fancy looking or that you don’t plan on monetizing (making money from), then a free theme is probably your best bet.
To find free themes simply hover over Appearance, then click Themes -> Add New and browse the nearly 3000 free themes available. As you can see, there are a few filter options, such as sorting by popularity.
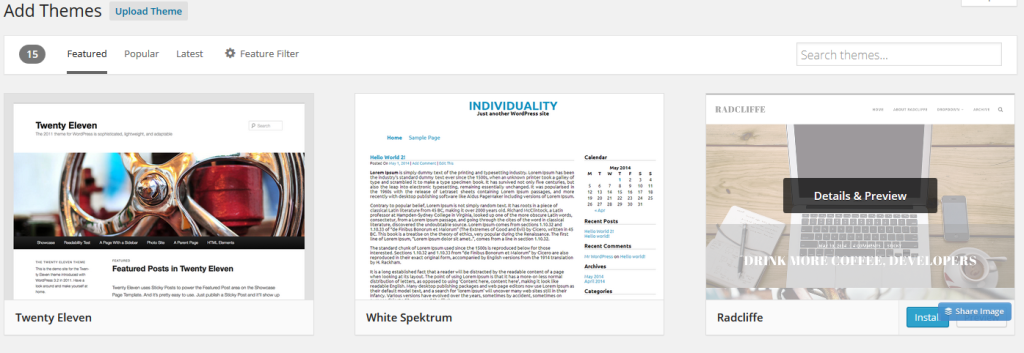
Simply hovering over a theme will give you options to preview, view details, or install. If you like the theme simply click the blue install button and presto, your theme is installed and now you just need to activate it.
Step 4. Add Functionality to Your Website With Plugins
One of the best things about WordPress is the ability to install Plugins in the Dashboard. Think of these plugins as mini-features that add functionality to your website or blog. These plugins range from contact forms and social share bars, to SEO (search engine optimization) plugins and shortcodes. Like with the themes, WordPress offers free plugins (over 34,000), but also like with the themes, many of these plugins are very basic and suffer from the same disadvantages as the free WordPress themes, such as relying on the developer to constantly update the plugin to be compatible with the latest WordPress update.
Unlike with free WordPress themes, there are actually a few very solid and feature rich plugins available. I will list a few of these and encourage you to check them out once your WordPress blog is up and running.
WordPress SEO Plugin by Yoast – an excellent and feature rich Search Engine Optimization plugin that allows you to optimize each and every one of your posts and pages for the search engines (Google, Yahoo, Bing).
WP Super Cache – a nifty plugin that helps speed up your website.
Contact Form 7 – a simple and flexible Contact form plugin.
My personal favorite is the SEO plugin by Yoast. As for premium plugins, it doesn’t get any better than codecanyon, who have plugins for virtually any feature you could want for your website or blog including post voting, fundraising, comment control, SEO, membership and ads.
Not too bad was it? Now you are ready to create great content and drive traffic to your website/blog. If you are stuck on something or have any questions, feel free to contact me via the contact page (I answer all questions). 